An Aeropress is an inexpensive way to make coffee and espresso drinks, but using it for the first time is perplexing! When I’m in need of caffeine, reading tiny instructions or looking up a complex how-to video online is the last thing I want to do.
That’s why I illustrated this visual reference sheet of Aeropress instructions. Specifically designed for guest suites, Airbnb’s, and vacation rentals, these Printable PDF Aeropress Instructions are stylish enough to display. Clear visuals make the instructions easy to understand even for non-English speakers.
My Printable PDF Aeropress instructions are free for a limited time!

In this article, I share my illustrated instructions for making coffee using an Aeropress. This PDF art can be downloaded and used in your Airbnb, vacation rental, or guest suite to help guests and visitors understand how to make a great cup of coffee using an Aeropress.
Using an Aeropress requires a few more steps than making a traditional cup of coffee, but the quality of coffee produced by this device is in many ways superior to other types of coffee. In fact, there are cafés in Seattle with espresso machines worth thousands of dollars which still offer a hand-brewed cup of Aeropress coffee! It’s that good when made well. The shot of espresso produced by an Aeropress can be used to make Americanos or lattes.
Download this Free Printable PDF: Illustrated Aeropress Instructions
Download this Free Printable PDF
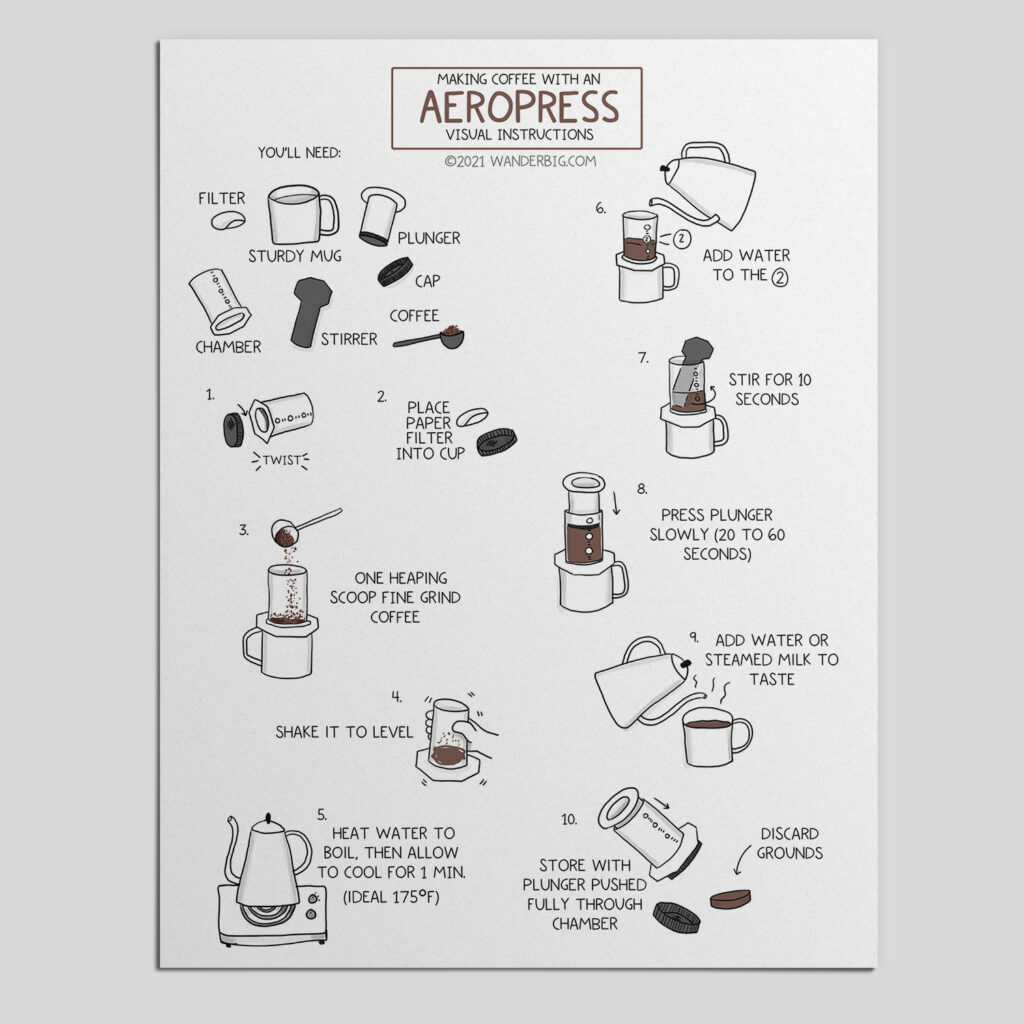

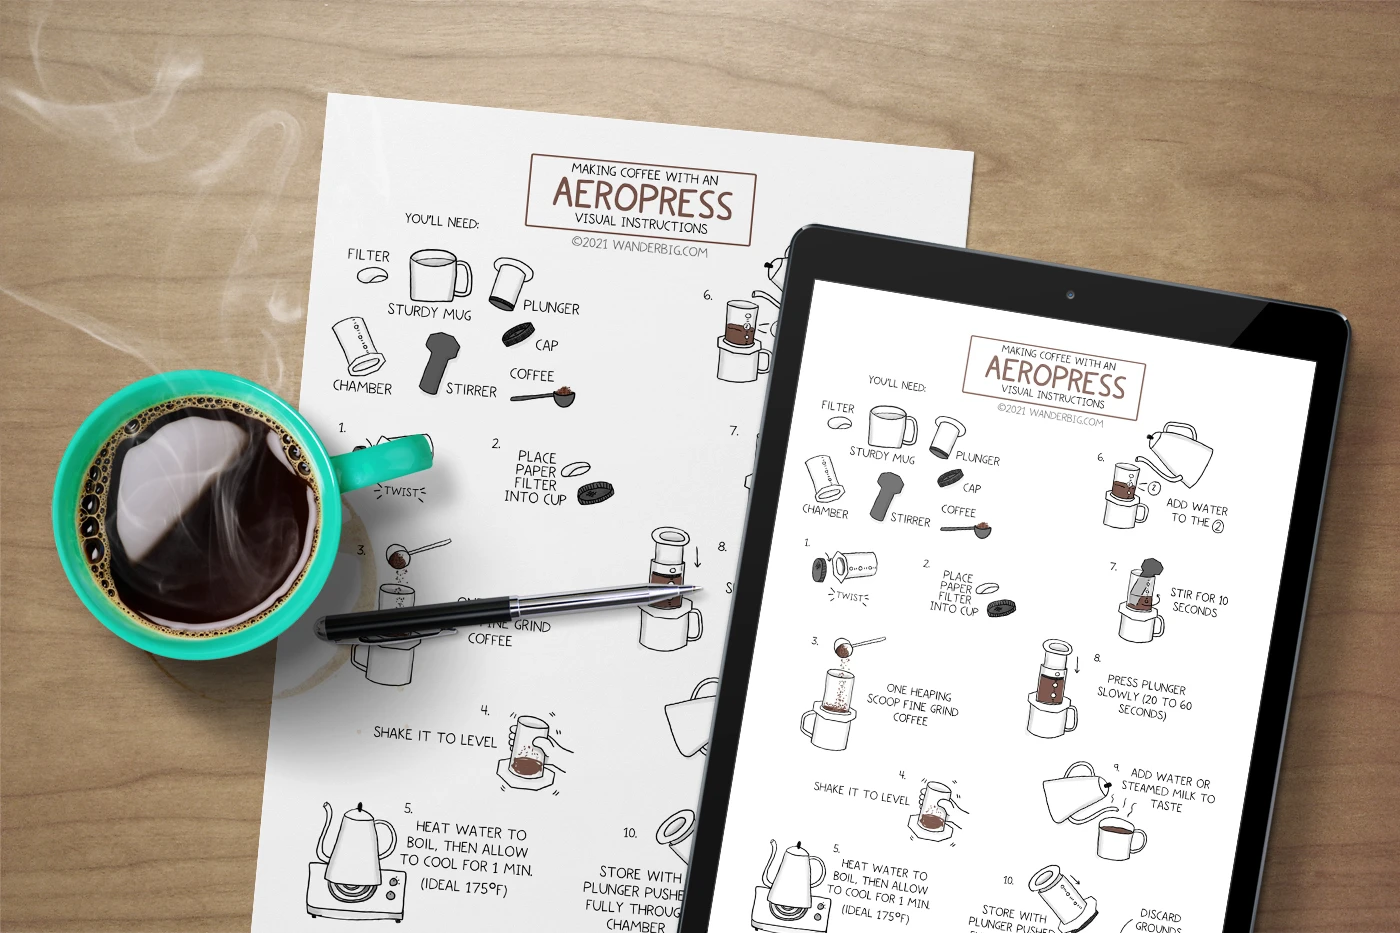
Illustrated Steps to Make Coffee Using an Aeropress
The following section may contain affiliate links. As an Amazon Associate, we earn from qualifying purchases.
To start, you’ll need an Aeropress. If you don’t already have the device on hand, Shop for one on Amazon.
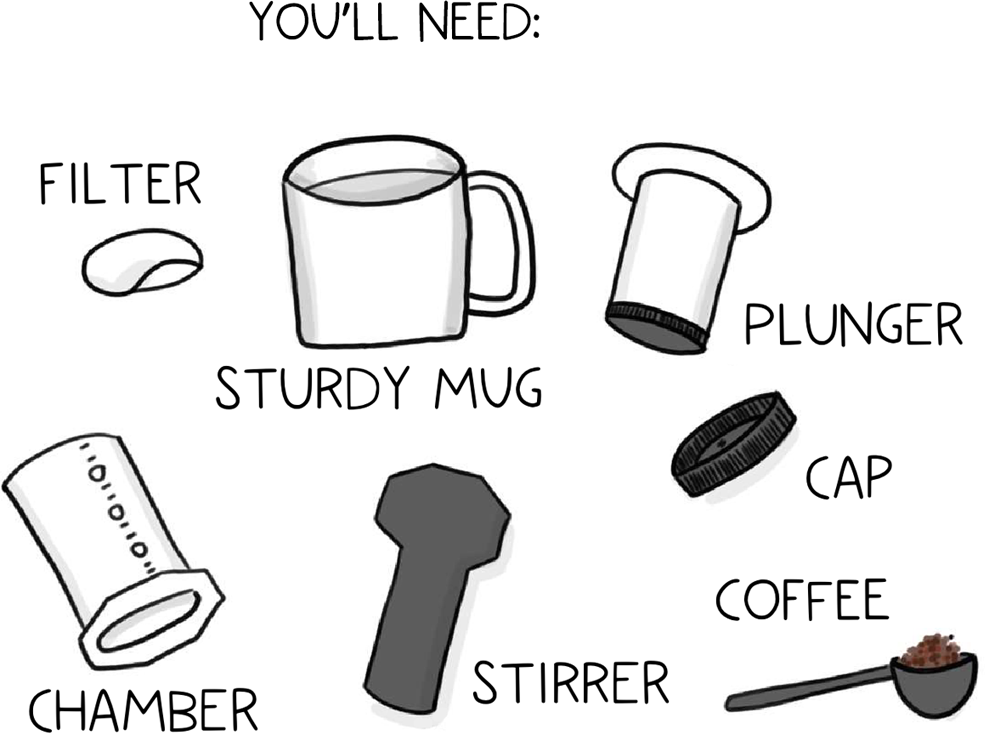
The first step in making a shot of espresso using an Aeropress is to be sure that all of the parts needed are clean and ready to use. Without a filter, cap, plunger, or coffee grounds, it’s impossible to make a shot of espresso or cup of coffee using an Aeropress.
Once you have the following items, you can begin brewing a shot of espresso using an Aeropress.

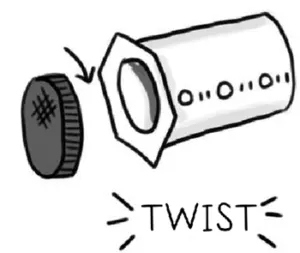
To begin, place a filter into the mesh cap of the Aeropress. This filter paper works like a drip coffee filter, holding the grounds of coffee in place while the pressure builds behind the filter. The pressure will force through only the flavored liquid, not the grounds.


With the filter in the cap, place the cap onto the body of the Aeropress and twist. The cap will twist into place, locking the cap onto the body of the Aeropress. This helps the tool stays together even when pressure is applied to the plunger.

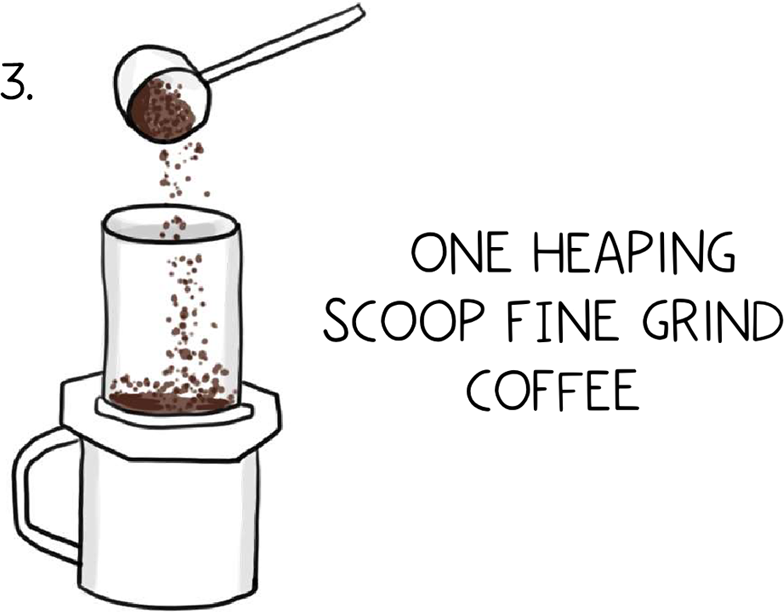
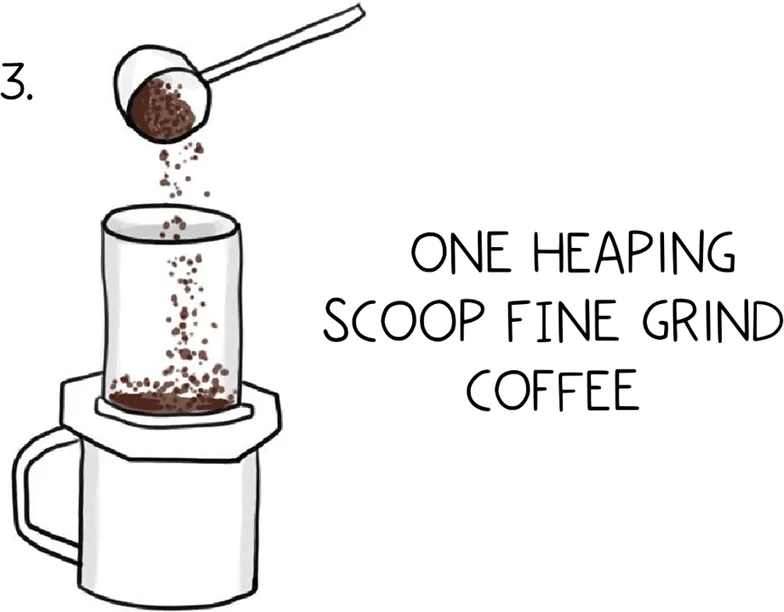
Now, with the filter and cap in place, add coffee grounds to the barrel of the Aeropress.
Shake gently to level and then place the Aeropress on top of a sturdy mug. Be sure that the rim of the Aeropress is steady on the rim of the cup.


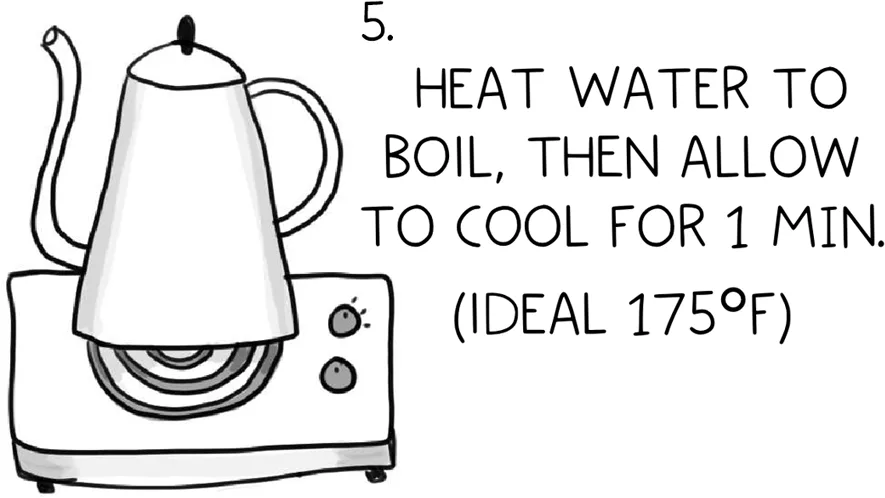
Heat some water. If you have a thermometer or a kettle with digital temperature control (get my favorite kettle here at Amazon), heat the water to 175° F.
If you don’t have a thermometer, you can either just remove the kettle from heat just before it boils (For reference, at sea level, water boils at 212 ° F). If it boils before you can stop the kettle, just let the water cool for 1 minute.

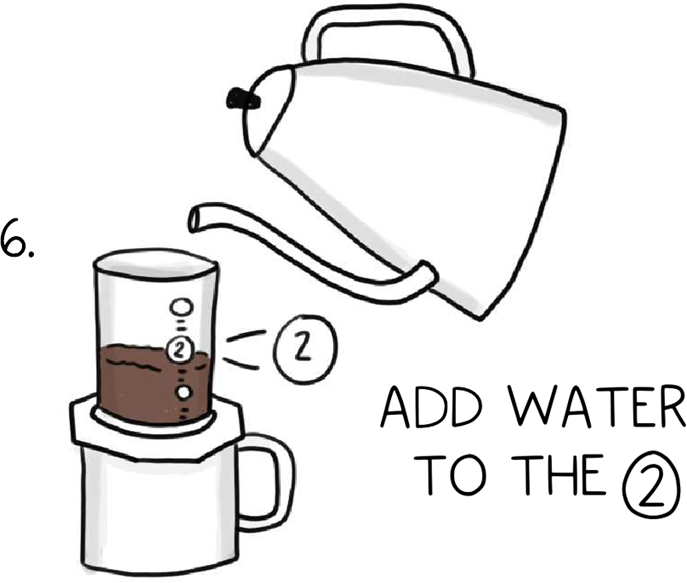
Place the Aeropress on top of a sturdy mug. With water and Aeropress ready, pour the water into the barrel of the Aeropress, allowing the water to mix with the coffee.
Be sure that your mug is sturdy enough for you to press down firmly on the Aeropress during the espresso shot-making process – very delicate mugs or teacups may break!

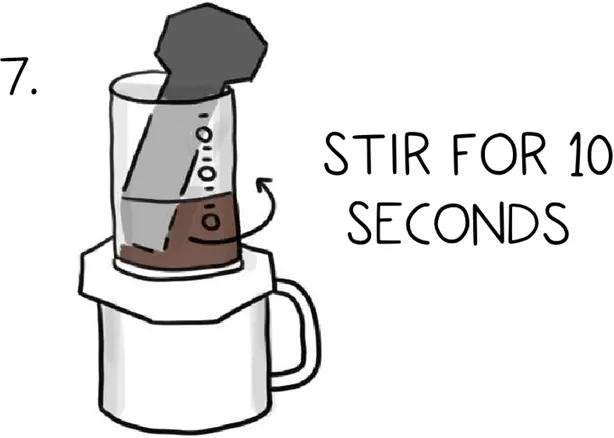
Use the stirrer to mix the water with the coffee grounds. Mixing helps the brewing process begin. If you’ve lost the Aeropress stirrer you can stir with a spoon, but be careful! Aggressive stirring with a spoon can tear the fine paper filter lining the bottom of the chamber.

Next, place the plunger into the barrel of the Aeropress. Slowly push the plunger down, and force the air and water trapped in the barrel to filter through the grounds and filter paper. As you do, espresso will drip into the mug waiting below.


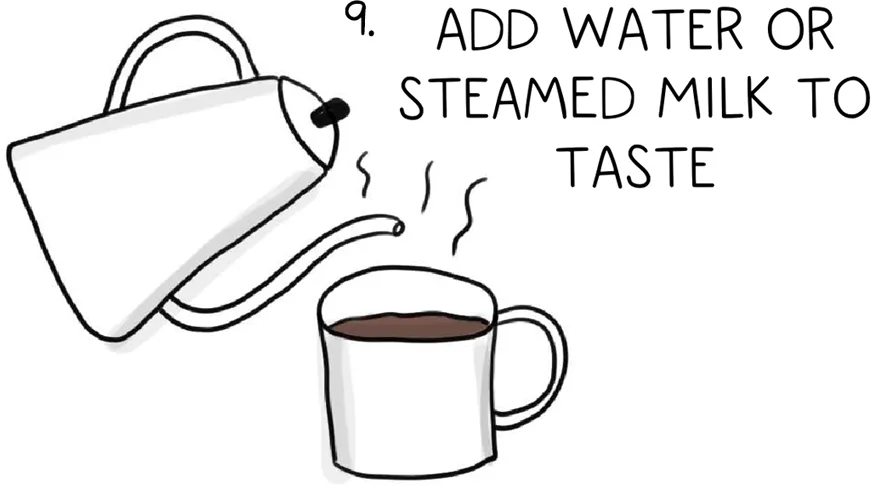
After all of the air and water is pressed out of the brewing chamber of the Aeropress, you’ll find an espresso shot in your mug.
You can use this for an Americano or another espresso drink. If you’d like a simple cup of American-style brewed coffee, just add hot water to this concentrated brew.

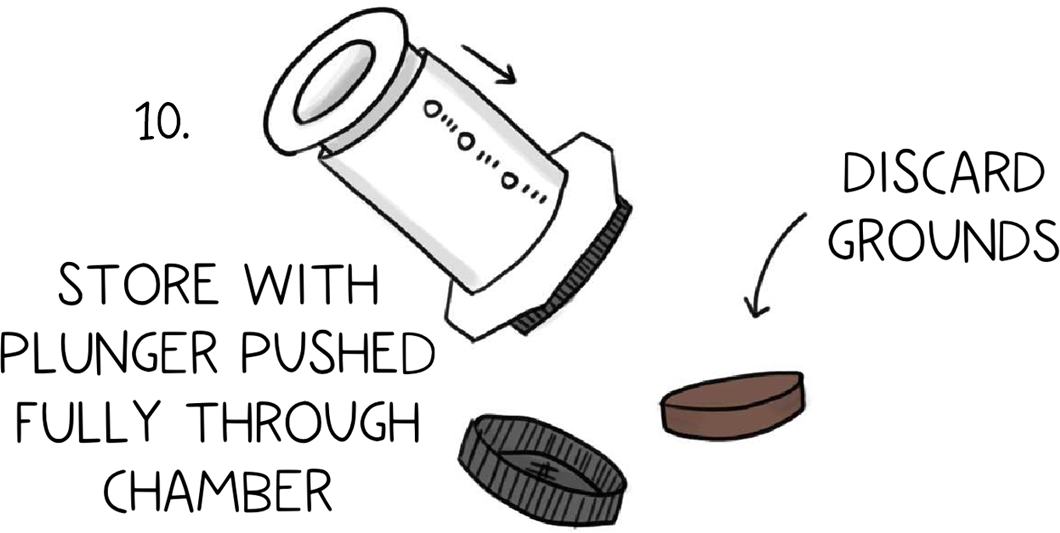
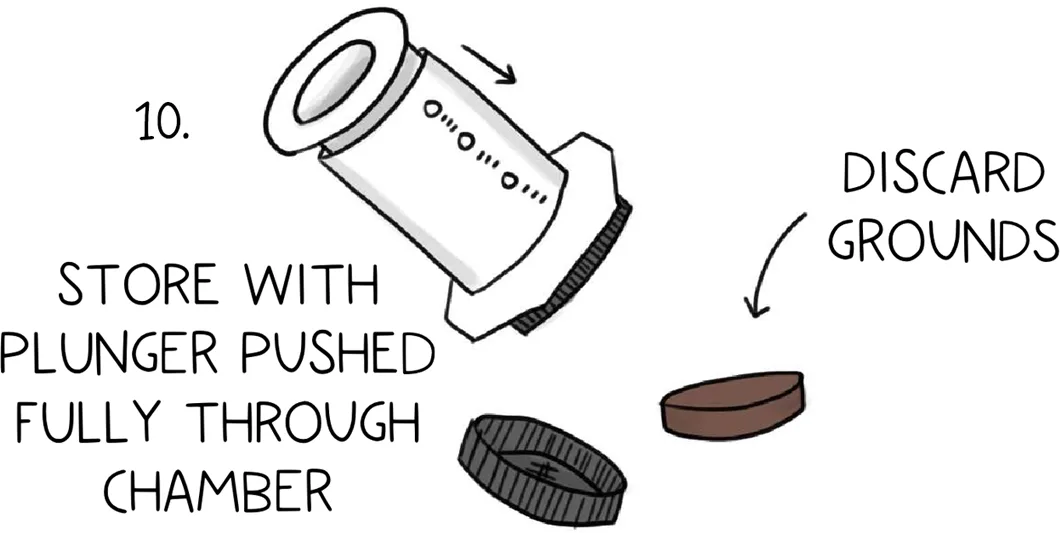
To clean and reset the Aeropress, follow these quick steps:
- Let the coffee grounds to cool,
- remove the cap,
- place the filter and the now-compressed brick of coffee grounds into the compost or garbage,
- and rinse the Aeropress.
- Dry completely and then store the Aeropress with the plunger pressed completely through the barrel. (Storage in this position ensures that the seal doesn’t wear out early.)
These doodles were created by hand and inspired by my own use of the Aeropress device. I don’t claim any ownership of the Aeropress trademark or related brands. However, my art is copyrighted.
For permission to republish, check out Wanderbig’s repost policy. If you’d like a copy of these printable instructions for using an Aeropress, get a free copy today in exchange for joining my mailing list (don’t worry, I hate spam as much as you do and rarely email visitors- only when release new content I’m particularly excited to share!)
Aeropresses in Airbnb’s
If you’re an Airbnb host, An Aeropress can be an easy way to provide high-quality coffee to your guests. While coffeemakers are just another appliance taking up space on the countertop that requires cleaning, the Aeropress is a tidier way to provide a coffee-making tool to your guests. As a bonus, an Aeropress makes much better coffee than a standard drip coffee maker which will create great impressions and build those coveted 5-star Airbnb Reviews.
Although this method for making coffee in an Airbnb has a little bit of a learning curve – as evidenced by these illustrated instructions – the coffee made through an Aeropress could rival that made by an espresso maker.
By providing an Aeropress and instructions in your Airbnb you can add to your Airbnb all the benefits of an espresso maker without the expense of adding another appliance. For long term Airbnb renters and guests considering a monthly stay in an Airbnb, a few minutes of learning to use this coffee-making device is time well spent to have quality coffee throughout the whole trip.
Hint: great coffee- and sometimes snacks- is one of my best Airbnb Host Hints
Illustrated Instructions for Non-English Speakers
It can be particularly difficult to communicate with Airbnb guests that are not English speakers. In these cases, it may be difficult to explain how to use appliances in your rental.
These illustrated Aeropress instructions are an easy workaround – the easy-to-understand illustration of each step of making a cup of coffee with an Aeropress is shown with a simple illustration. These drawings are easy to follow along, even for people who cannot read the written instructions on the PDF.
Aeropresses for making coffee in your car
The Aeropress espresso maker means that you can make espresso-based drinks anywhere that you have hot water. As I discussed in my article on road trip food, a simple AC adapter water heater is an easy way to heat and boil water during a road trip.
To make your own high-quality espresso drink during a road trip, all you need is clean drinking water (like you can find at most rest stops or that you may wish to carry in a jug from home), a water heater that plugs into your car’s AC adapter or USB plug, ground coffee, and an Aeropress.
Packing an Aeropress for International Travel
Although handheld espresso makers like the Nanopress are becoming increasingly popular for digital nomads, an Aeropress is a classic option for international travelers who want to ensure that they’ll have an excellent cup of coffee no matter where they travel, whether it’s Airbnb kitchens, a hut on a floating island, or even grabbing a snack in the middle of a road trip.
While decent coffee is available in many places around the world, not every nation has the same high value on quality espresso as we do in much of the Western world. (For example, I really wish I had taken an Aeropress with me when I visited Chile, where instant coffee is the standard and actual brewed coffee or espresso is difficult to find- so much so that it made my list of things I wish I’d packed for South America)
Why I Made Illustrated Aeropress Instructions
When I briefly converted my Seattle apartment to an Airbnb (while I was solo traveling in Florence, Italy and later Lokrum Island and Cavtat, Croatia), I knew that I needed to provide my guests with a coffee-making method for early morning coffee needs. Since I didn’t want to buy a coffee maker that I wouldn’t use after I returned home, I left my Aeropress for my guests. This too, however, presented a unique challenge, since, unlike a drip coffee maker, using an Aeropress is not second nature to most of us Americans. So I set out to create a user-friendly sheet of instructions that anyone could use to learn to make coffee or espresso drinks using an Aeropress.
Lynli Roman’s unique approach to travel is informed by decades of experience on the road with a traveling family and, later, years spent as a solo international traveler. When she’s not writing about Seattle from her Pike Place Market apartment, Lynli writes on-location while conducting hands-on research in each destination she covers. Lynli’s writing has been featured by MSN, ABC Money, Buzzfeed, and Huffington Post. She is passionate about sharing information that makes travel more accessible for all bodies.
Malcolm Glass
Sunday 11th of December 2022
P. S. I remember from the original instructions that the inventor of the Aero Press said he would rinse and dry the filter and use it again - many times. Save paper!
Malcolm Glass
Sunday 11th of December 2022
Thank you so much! My manual disappeared along with the Aero Press. But I recently found the press, but no instructions. I wanted to brew a cup but wasn't sure of the amounts to use. Now I can use this marvelous device again!